Friday, August 20, 2021

Learn How to Make Flower & Fairy Rub-On Transfers for Glass Mason Jars

Hi and thank you for stopping in to check out this blog post all about how to create your own rub-on transfers for glass.

On this page I will provide step by step instructions on how to create translucent motifs and also non-translucent motifs

While I prefer the translucent for glass jars because the light from the (battery-operated) candle will shine through, it's not necessary for the beauty of the jar itself. 

I hope you will find the information on this page interesting, fun and valuable and that you will be able to use it in creating your own projects and, well, just plain have fun with it!

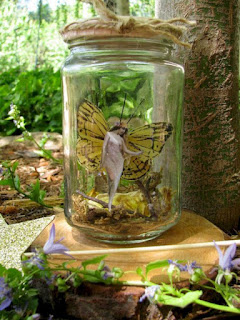
When you're done reading and watching the videos provided, you should be able to create a fairy jar just like the one pictured below...


This all started for me because I wanted to create a fairy jar that can be used as a night light and I wanted my images to be translucent.

As I was formulating this project in my mind I thought maybe rub-on transfers would be a great way to get the result I wanted.

However, as my search started on line for transparent fairy and flower rub-on transfers, I found that the selection was not there.

Perhaps they do exist, but I could not find any rub-on transfers that would allow the light to shine through so I realized then and there that if I wanted this to work I would have to make them myself.

I would also like to mention that although I could not find semi-transparent transfers, there were quite a few flower rub-on transfers available.

As a side note, please keep in mind that you don't have to go to the extra steps to make the rub-on transfers translucent (it's just a personal choice) because there are definitely a couple of more steps involved.   I will include directions for both on this page.


A Fairy Jar can be made with
 pre-cut fairy silhouettes

So feeling just a little discouraged and not wanting to give up on my idea, this is where sheer determination comes in!

As my mom always told me when I was a child, "use your noodle, Nancy".   In case you don't know what the noodle is, it's your brain, LOL!  Brains can look like a noodle...get it?

...haha, okay, it's not THAT funny, but I just thought about my mom saying that to me, so I thought I'd share.  My lovely mom was full of sayings...

I came up with a plan to make beautiful motifs using wax paper, Mod Podge, and clear contact paper

You can purchase most of the supplies for the project on this page in a store like Walmart or Target or Michaels.  However, I will link the Supplies List down below to where you can purchase most of them on line at Amazon.

As I mentioned above, you can make translucent rub-on transfers by using simple kitchen wax paper.

Wax paper translucent (semi-transparent) so it makes great transfer images that can be glued to the outside of a glass jar.   Translucent transfers are the the way to go, especially if you want to use a candle inside the jar and have the images show through the light.

If you decide on translucent images for your glass fairy jar project, I don't think you will regret it as the light glowing through the images makes a great effect glued to the outside of the jar.

Safety Tip:  If you are gluing anything inside of the jar, always use battery operated candles.

To make your own semi-transparent rub on transfers for a fairy jar, please follow the steps outlined here...


DIRECTIONS:

How to make your own semi-transparent flower and fairy rub-on transfers

Before you begin:

Take a sheet of regular kitchen wax paper (at least as large as 8 x 10") and using a paint brush, coat it with Mod Podge.  Let it dry thoroughly. 

After the Mod Podge dries on the wax paper, trim the wax paper around all sides to be about 1" less than a regular piece of computer paper.

Use Scotch tape to secure the wax paper (dried Mod Podge side UP) onto the computer paper and place it in the rear tray of your computer and after following the Steps 1-   below, print your image onto the wax paper.

Now onto finding and downloading an image you would like to use for your fairy jar...


1.   Select a fairy image that you would like to use from a search engine like Pinterest (to do that go to the next step).

2.   Go to Pinterest.  In the search bar type 'flower fairies'.  Your results should look something like this...


Search results from my Pinterest board
'Flowers for Fairy Jars' where I keep my 
pictures of fairies for use in my art projects


3.  Select a fairy image you would like to work with (from whatever search engine you like).  From my Pinterest search results (see above picture) I chose the 7th one from the left on the top row (in the picture above) to make my translucent fairy rub-on transfer for this project.

This is what it looked like at the top of the page (see picture below) after I put my mouse over the smaller version of the picture and 'left clicked' on it...


When you find an image you want to use
'left click' over it with  your mouse whether
on Pinterest or another search engine.  This
is the fairy I used from my Pinterest board.
After you left click on the smaller image from
the search results, it will make a larger version
 of the picture at the top of the screen.
Always copy from the larger image
to paste into your WP document
(see next picture below...)


In Pinterest after 'left clicking' on the image, the image will appear larger on the screen.
'Right click' over the larger version of the image and select 'Copy image'.
Open a WP document and select 'Paste'.  Now your image is in WP and can be resized
and changed.  Use the 'Format Picture' commands at the top of the WP page to add color
 or change the picture in any way you like.  Resize the picture in WP document
by 'left clicking' on the black outline around the picture and moving your mouse
 back and forth until the size is right.


If you would like to see a video presentation of this process (in Step 3), you can watch it here at the video below...

Flower Fairy Mason Jar - "How to Find, Download and Print Fairy Pictures to Make Rub On Transfers"


4.   Now you will be printing your image onto the wax paper that has been attached to the computer paper with Scotch tape.  Here is what it will look like before you print it.  


Secure the wax paper with the dried Mod Podge
face up onto a piece of computer paper with 
Scotch tape (It might be hard to see, but
can you see the Scotch tape in the image above?)


5.  Place your wax paper/computer paper (see pic in Step 4 above) into the rear tray (or manual feed) of your inkjet printer.  I placed an arrow marking the direction the paper will face as it is printed because sometimes I print it twice to get more ink on the picture.

It will look like this before you use your Print command to send the picture to print from the rear tray (or manual feed depending on what printer you have access to)...


6. Send your image to print from the rear tray.  Your print commands may be different from mine depending on what word processing program you have, but look for things like 'Advanced Settings', 'Properties', or 'Select Paper Source'.   Send it to print from the Rear Tray (or manual feed)...


And now here it is!  All that's left to do is apply
the clear contact paper the front and back
and then cut it out.

7.  After it is printed,  cut around the outside lines of your wax paper/computer paper fairy image out so that all ink is included in the cutout.


8.  Take your roll of clear contact paper and cut a piece (while it's still NOT PEELED BACK) that will fit over the front of your fairy image .   After you cut a square, peel back the contact paper and place the sticky side on the wax paper front of your fairy image with the ink printed on it.  The ink should now be covered with clear contact paper.


9.   Turn your image over and using your Arteza paint pens or Sharpies add color to the back of the fairy image .  This is a great way to get more color on the image.  It will look like this....


Color the back side of the wax paper,
not the contact paper side.


10.    Cut around the outline edges of the main part of the image so that all you really will have is the foreground image with none of the background (see picture below)...


Red Poppy Fairy after being cut
out from the background.  It is
now ready to be glued to your jar!
  

11.  Using a glue stick or a clear drying glue like Elmers, coat some on your jar and position your hand-made rub on transfer to the outside.  It will look something like this...


Red Poppy Fairy Rub-on Transfer
glued to the outside of a mason jar. 


12.  Finishing Touches:  If you wish to add more motifs to your fairy jar, I suggest making more cutouts of flowers with the steps outlined above.  Instead of searching for fairy images on Pinterest though, search for 'flowers'.   Make your selections from the search results.

Download your flower selections into a word processing program and print them out onto regular computer paper and glue them to the other sides of your jar with clear glue.  To learn more about how to do this, read the following...

Learn How to Find Pictures on Your Computer, Resize and Print from a Word Processing Document

Here is a picture of some of the flower motifs I made by downloading them into a word processing document.  I then resized them and printed them on regular computer paper (no wax paper necessary), applied contact paper to them and cut them out around the main edges...


Flower & Fairy Motif Cutouts


Use a glue stick, Elmers white or clear glue
to apply your motifs to the outside of your
mason jar.  Do not use Aleen's Tacky glue
as it does not dry clear.


Using a paint brush add clear glitter glue between motifs to the outside of your jar to add extra sparkle.

Paint the top of your jar with white chalk paint.   After the paint dries, glue a large flower on top of it to cover the jar.   Glue or wrap jute or lace around the edge of the top for extra flare.


______________________________________________________

SUPPLIES LIST (You may or may not need all for this particular project): Mod Podge Matte Gel Medium

Place a battery operated candle inside the jar.  Now you have a beautiful fairy night light!

I really hope you enjoyed this tutorial.  If you have any questions at all, please don't hesitate to leave them in the 'Comments' section and I will get back to you asap.

In the meantime, remember my motto...

“Be creative & Be happy!”


Where else can I find images to use in my decoupage projects?

While there are many places to buy images on line (like these sunflowers) at sites like Amazon or in a local store, you can also find free images to download for decoupage projects as well.

You can buy floral napkins and decoupage papers, but if you want to create your own motifs, you can also print most pictures onto napkins or tissue or gift tissue paper to use in decoupage as well.

Another place to look is The Graphics Fairy where there are numerous categories of free images available to download.   Here is a link to 50 free flower images from this wonderful site.

Or perhaps you would just like to start making your jars with silhouettes from The Graphics Fairy.

You can cut pictures out of magazines.  There is also a large inventory of clip art on line that you can purchase the rights to, or you can use my tried and true way which is finding pictures on line by typing search words like ‘realistic flowers’ into your search engine and clicking on 'Images'.  (Use the 'Copy & Paste' method outlined in Step 3 above to resize and print any picture you find on the Internet).

If you would like to use this method to find flower images, then follow Steps 1-9 below.

The following instructions outline an easy way to save and print images from your computer.  If you can copy and paste into a word processing document, then you can do this!

1.    In your browser, type the name of a flower you may want to use in your project, such as daffodils.  Position the mouse over ‘Images’.  Hit Enter.

2.   You will see all sorts of pictures of daffodils as a result.

3.   Choose one you would like to work with (try to choose one that will be easy to cut out, with defined lines).  Position your mouse over the picture and 'left click' on it with your mouse.  The image should appear larger now..

4.   Now 'right-click' on the larger version of the image you've selected and it will bring up a menu.  Select ‘Copy Image.’

5.   Open up a word processing document in another window (or you may want to already have an open blank word processing document in another window waiting).

6.   In the word processing document, right-click and select ‘Paste.’

7.   Your image will appear, and you can resize it simply by left-clicking again over the image, which should outline it with a black border and dots to mark the corners.  With the size of the piece you're working on as a background in mind, resize the picture to fit by moving the mouse back and forth while gripping the corner of the image.

8.   Print on a color printer.  Cut your image out and paste it to your glass jar using Mod Podge.  A simple white craft glue like Elmers also works just fine to adhere your design; however, you will need Mod Podge Matte Gel Medium to seal the piece when you are finished designing it. This will give it a polished and beautiful finish.

9.   This is an easy and inexpensive way to find images for decoupage projects!


Thursday, August 19, 2021

Faux Stained Glass

I came across this beautiful stained glass craft on an amazing website the other day, Susie's Artsy-Craftsy Sitcom.   You will find a link to the directions here.


Faux Stained Glass Peacock


There you will find over 200 craft tutorials!  The one that jumped out at me though was the stained glass peacock made with glue and paint.  Easy peasy.

And I love easy peasy crafts!

Stained glass is a stunning craft that I have always wanted to try.  However, since I'm not a fan of cutting glass and the mess and learning curve that would be involved with ordinary stained glass projects, I had never tried it.


So it's actually the simplicity of the faux stained glass project pictured above and the endless possibilities are what attracted to me to wanting to try it.

Oooh, maybe I'll make a faux stained glass cardinal!...


Cardinal Stained Glass


So off I went out to the Dollar Tree and bought a frame for, yep, you guessed it, a dollar!  LOL!!!

I already have paint brushes and acrylic paints so I didn't need those.

Now, on to finding stained glass patterns.  You can purchase stained glass coloring books at most craft stores like Michaels or Hobby Lobby or there may be more selection on line 

I recently purchased Trace & Paint Flowers (pictured below) at Hobby Lobby because I want to start painting flower canvases, and now I think it will come in handy for this craft as well.

This book contains outlines of each of the painted pictures of flowers within.  They are removable and very easy to insert under the glass you will use to make faux stained glass.


If you would like to try this project without purchasing a book, you can just type stained glass flower patterns into your browser, and click on 'Images' to get free patterns.

The method I have outlined directly below will allow you to use just about any picture you can find on the Internet.

To use this free method follow Steps 1-7 in the instructions below:


1.  In your browser's search engine, type "stained glass flower patterns".

Here are links to other subjects that may be wonderful to use in this craft (all are affiliate links, so if you purchase from these links, I will earn a small commission at no cost to you).

(Directions continued below...)

Stained Glass Pattern Books:  

Butterflies
Birds
Mandalas
Fairies
Unicorns
Mermaids
Garden Flowers

(click on the word above to see each different book available on line)


2.  With your mouse 'Right click' over the picture you would like to paint, and select 'Save image as'.  Save it to your desktop so that it's easy to find.

3.  Find the image you selected on your desktop and with your mouse over the picture, right click on 'Copy'.  

4.  Immediately following, in another window, open a word processing document.  Now from within the document, select 'Paste'.

5.  Your image will appear with a black outline around it.  Now you can resize your image with your mouse.  'Left click' with your mouse on a corner of the outlined picture and move your mouse back and forth to resize the picture to the size you need.

Tip:  The image will be true to size in your WP document so use your screen as a guide to the size you will need for your project.

6.  Print your image.

7.  Have fun!

Here is a link to the directions for this amazing and inexpensive craft that the whole family can enjoy.


Links to my PINTEREST Boards:


<< See most of my artwork here:  nancymaggielee>>


Watch a video of me making a faux stained glass project:


Faux Stained Glass
PART 1


Faux Stained Glass
PART 2


How To Use an Opaque Deco Paint Marker 
in the art of Faux Stained Glass


Deco Color Paint Pens are available on line in many colors or they can also be purchased at Hobby Lobby


If you click the picture above to purchase on Amazon,
I will earn small commission (at no cost to you)


Thank you so much for stopping by today, please let me know if you have any questions.  You can contact me at nancygirlcreations@yahoo.com or leave a question in the 'Comments' section on this post.  

And just a reminder, always remember to...


Be creative, and be happy!

Saturday, August 14, 2021

Learn How to Find Pictures on Your Computer, Resize and Print from a Word Processing Document

Follow the steps below to get pictures from your computer that can easily be downloaded into a word processing document and resized to fit on your canvas (a rock perhaps?)

1.  Go to your computers search engine (I use Google) and type what you would like to find a picture of into the search bar.

2.  In this example, I will be searching for a "hummingbird" (but you can type in whatever you would like, perhaps "garden flowers").  So type 'hummingbird' into the search bar (see picture below...)


3.  Hit 'Enter'.  Nextdirectly underneath the search box or somewhere on the page depending on what search engine you use, you should see a list of choices, they are:  Web, Shopping, Images, Videos, News, More.  Select "Images" from the menu below by left clicking with your mouse on your search screen...


4.  You will see many pictures of hummingbirds appear.  Scroll down until you see one you would like to use for your project.


5.  Using your mouse, hover over your selected picture and 'Left click' once on the picture to make it larger (you should see the picture you selected pop up larger somewhere on your screen).


6.  Now with your mouse, move to hover over the larger version of your selected image and 'Right click' on it (refer to the picture directly below this paragraph).  Select 'Save Image As' from the choices in the box that pops up (it's the seventh choice down in the selections on Google, NOT 'Save LINK As' - there's a difference)


The hummingbird I selected is shown on the right hand side of the screen above.
On the left side of the screen are the smaller pictures of the hummingbirds before I 
selected the one I want to save.  It is the one in the last row on the right.  


7.  You should now have a new window pop up and at the bottom of the screen you should see two long white rectangular boxes, one will be asking you where you want to save the picture, and the other how you want to save your picture...


8.  The answer to 'Where' is 'Desktop' and you should rename it 'hummingbird' in the white box, erasing the computer given name of letters and numbers that it was assigned automatically by backspacing over them and typing in "Hummingbird".  The answer to 'How' is as a 'JPEG' (bottom rectangular box).


9.  Now go to your Desktop to locate your picture under the name you saved it to, in this case "Hummingbird".  Open the picture by hitting the 'Left click' button on your mouse while hovering over the picture file on your Desktop.   When the file opens up, 'Right click' while hovering over the picture and in the box that pops up select 'Copy' or 'Copy Image'.


10.  Directly after hitting 'Copy' or 'Copy Image' in the step above exit out of  where you have the picture saved.  In another window, open up a blank word processing document.  'Right click' in the blank word document file.  Select 'Paste'.  Your image should appear!  It should look something like this...


11.  Once the image appears, hover over the picture and 'Left click' on it.  A thin lined box (see the picture above) should appear around your image and now you can resize it easily by clicking on the corner of the box and pulling it with your mouse until it's the size you like.  Save your image into this word processing document for reference or to resize it if you'd like to make it smaller or larger.


12.  If you are going to use this picture to transfer onto a rock by drying it face down onto the surface using Mod Podge, then you should format the picture by flipping it horizontally before you print it out (use the Format button, see the picture above for reference - Format is the last selection on the top line in the word processing document)


13.  Print out your image on your inkjet printer.  You can also print a 'Mirror Image' in the print commands to skip Step 12 above.


14.  If you are going to use my freezer paper method of image transfer, click on the video link below to learn how to print on freezer paper from your computer.


RELATED VIDEOS:


Please note that the videos linked below may have a different subject matter (not “hummingbirds”) and they are just here for your reference and to help you learn about this process.


If you have any questions about the process outlined here, please leave your question(s) in the ‘Comments’ section on one of the videos linked below.


How to Make Freezer Paper Sheets for your Inkjet Printer

https://www.youtube.com/watch?v=0EYCIbkP9lo


Printing Commands Tutorial for Printing onto Freezer Paper

https://youtu.be/E1F_Bo_z0LM


Once you've printed your images onto freezer paper, you can learn how to transfer them onto your rock by watching the video below:


How to Transfer an Image to a Rock Using White Acrylic Paint and Mod Podge https://www.youtube.com/watch?v=mkw4RLWs_sk


Learn How to Decoupage Christmas Movie Images onto Ornaments

Hi there and thank you for stopping by! I wanted to make a specific tutorial on how to create Christmas ornaments using images from your fa...