
Hi there and thank you for stopping by!
I wanted to make a specific tutorial on how to create Christmas ornaments using images from your favorite Christmas movies. Here is a picture of the ornament I made using the methods outlined on this page...

Most everyone has at least one favorite Christmas movie. Christmas movies bring wonderful memories to mind at this joyous season!
However, it's not so easy to purchase ornaments displaying the images from movies because there are all kinds of rules and regulations surrounding these images that make them almost impossible to find.
So, I thought, why not make your own??? I figured out a way to do that, and I will show you how in this tutorial!
My absolute favorite movie of all time is "It's a Wonderful Life" from 1947 starring Jimmy Stewart and Donna Reed. The ornament pictured above is from that movie and is the movie I will be using images from for this tutorial.
Do you have a favorite Christmas movie???
In this post, I will outline for you through step-by-step instructions, pictures, and video presentations how to make a decoupaged ornament from one of your favorite Christmas movies.
The images you will be using will most likely have to be resized and I will explain how to do that below. As a sidenote, you can use all the methods outlined here on this page to make other decoupage projects too.
Here is a link (directly below this paragraph) to an article showing you in detail how to find, download, resize and print images from your computer to use for art projects like this one:
Learn How to Resize Pictures and Print from a Word Processing Document
If you need assistance with any of the steps, please leave a question in the 'Comments' section below on this page.
Before beginning, you will need to gather the supplies listed below. If you need help with attaining any of these items, you can click on the underlined links and get more information for that item.
Disclaimer: If you do happen to make a purchase, I will earn a small commission (at no cost to you, so thank you so very much if you do!).
Here is a video outline for this project...
SUPPLIES:
1. Printed Christmas movie image (more in STEP 1 below)
 |
| Wood Slices are great for this decoupage craft (Click picture or any link above or below to learn more) |
5. Gift Tissue or White Kitchen Napkin
8. Scotch tape
9. Mod Podge
Are you ready?? Let's begin!...
STEP 1
Finding and Choosing an Image
1. Go to your favorite search engine (I like PINTEREST).
2. In the search bar at the top of the page, type in the term referring to your favorite movie, for example "It's a Wonderful Life"...
 |
| Your search results in PINTEREST will look something like this. |
3. From the search engine results, decide which image you would like to place on your ornament. After you make your decision, move on to the next step below.
STEP 2
Downloading Image to a Word Processing Document
4. Using your mouse, hover over the image you've selected, and 'left click' on the image two times to bring a larger version of the image to the top of the PINTEREST page.
5. Now, 'right click' on the larger image at the top of the page and select 'Copy Image' from the choices that appear in the menu that pops up.
 |
| 'Copy Image' from the large image at the top of PINTEREST page (Copy image is the highlighted choice) |
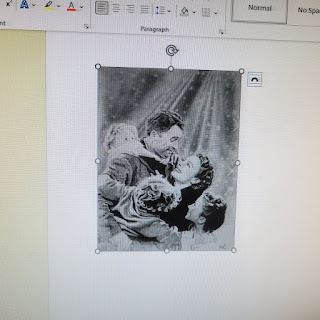
6. In an open word processing document, select 'Paste'. Your image will look like this when in the document...
 |
| 'Paste' (CTRL 'V') is the Image used for the ornament to be pasted into a word processing document |
STEP 3
Use the Format Keys to Resize and Frame the Image
7. Now that your image has been pasted into the word processing document, use your mouse to grab the circle on the corner of the image (see pictures below), 'left click' on the corner and move your mouse back and forth to make your image the size you need to fit the specific ornament you are making...
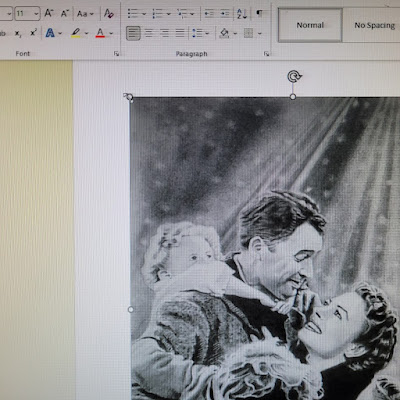 |
| Close up of the mouse on corner of image. In this one, notice the arrow over the circle indicating where to click with your mouse to move the line in order to make the image larger or smaller |
8. The image on the screen will be true to size when it is printed so move the line around the image to get it to be approximately the size you need for the specific ornament you are making.
9. Once you get the image size close to where you need it to be for printing, click on the image once again (while it is still in your word processing program) to get that black line around it.
You should see something like 'Picture Styles' pop up at the top of the screen. Select 'Soft Edge Oval' (or whatever style you would like to use). See the pictures below for reference.
 |
| Format Image Commands in Word Processing. I selected 'Soft Edge Oval' for this ornament. |
 |
| I taped ornaments to the screen to demonstrate how you will know how large or small to make your image as it will be 'true to size' when printed from word processing program. |
 |
| You can use the 'Picture Format Keys' again to make your image wide or narrow too. Remember to click on the image to bring the keys up to the top of the page. To make the image wider, grab the side of the image with your mouse and move left or right. You can also change the color of your image with these keys as well. |

 |


