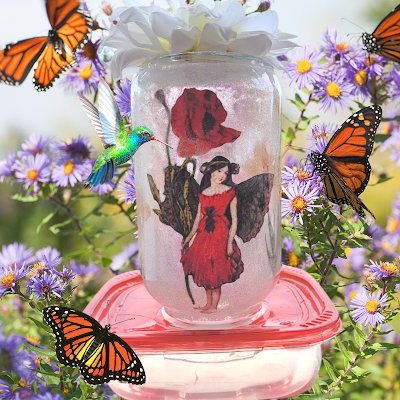
Hi and thank you for being here today to join me for a tutorial on how to create a beautiful hummingbird feeder like the one pictured below...
 |
| Flower Fairy Mason Jar Hummingbird Feeder made by nancymaggielee |
A few side notes before we begin with the tutorial...
- If you click on any of the underlined words, it will take you to a link where you can check out the item. As a disclaimer, if you purchase anything from this link, I will earn a small commission at no cost to you.
- The hummingbird feeder pictured above was made using a Hillshire Farms cold cut container for the base to hold the sugar water. These containers almost always have a red top and I like to use them because hummingbirds are attracted to the color red.
- Please watch the two videos below to learn how to make the fairy and flower images for your hummingbird feeder.
- For this hummingbird feeder tutorial, you do not have to print them on wax paper (as shown in the video presentations below) since regular computer paper will work too.
- With either choice of wax paper or computer paper, all you need to do is cover them with clear contact paper before gluing them to your fairy jar.
"How to Make Fairy Rub-On Transfers"
"How to Download a Fairy Image into WP to Print on Wax Paper"
You will only need a few inexpensive supplies to make a hummingbird feeder of your own:
Glass Mason Jars (or another clear glass jar)
Step 1:
Finding Images
Step 2:
Finding Images
Downloading the Pattern
From the search results, decide on an image you would like to make into a fairy jar. You are going to copy and paste it into a word processing document.
While on the image in the search results, 'left click' on it to make it larger at the top of the page. Always save from the larger image to get the best results.
Place your mouse over the enlarged image at the top of the page, and while hovering over the image 'right click' on it and now select 'Copy Image' (see pic below)...
In another window, open a new blank word processing document (or preferably have one open before you start).
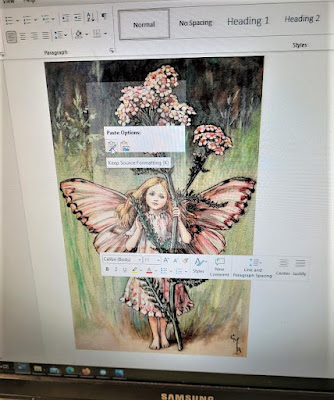
While in the new blank document, 'right click' again and select 'Paste' from the choices so that now your fairy image is in your word processing document (see picture below)...
Step 3:
Resizing the Pattern
You don't have to put the image on the back too, but this is something I like to do so that I don't have to paint it later.
You won't want to leave it unfinished with no color so either two or four is fine, however, just remember if you don't print four, then you will probably want to paint the back.
Painting Freestyle
Well, finally out of desire to create a fairy jar that can be used as a night light, and not being able to purchase transparent fairy rub-on transfers for glass, I came up with an inexpensive way to make them myself.
I love the process of creating something out of nothing, I guess that's why I love crafting! However, it's frustrating sometimes when I get an idea to make something and just can't quite seem to find the right supplies I need to make it.
This is where sheer determination comes in! As my mom always told me when I was a child, "use your noodle, Nancy". In case you don't know what the noodle is, it's your brain, LOL! Brains can look like a noodle...get it?
...haha, okay, it's not THAT funny, but I just thought about my mom saying that to me, so I thought I'd share. My lovely mom was full of sayings...
I came up with a way to make beautiful motifs using clear contact paper which can be purchased at any Walmart or Target or on line at Amazon.
Where can I find clipart to use in my glass jar projects? So you are basically going to be creating your own decoupage motifs and there are many places to find images for this purpose. One place to look is The Graphics Fairy where there are numerous categories of free printables. Two categories you may be interested in checking out are Botanicals and Flower images. Or perhaps you would just like to start making your jars with Silhouettes from the Graphics Fairy.
You can cut pictures out of magazines. There is also a large inventory of clip art on line that you can purchase the rights to, or you can use my tried and true way which is finding pictures on line by typing search words like ‘realistic flowers’ into Google and clicking on Images.
The following instructions outline an easy way to save and print images from your computer... 1. In your browser, type the name of a flower, such as daffodils. Position the mouse over ‘Images’. Hit Enter. 2. You will see all sorts of pictures of daffodils as a result. 3. Choose one you would like to work with (try to choose one that will be easy to cut out, with defined lines). Position your mouse over the picture. The picture should get a little larger. 4. Now right-click on the picture you've selected and it will bring up a menu. Select ‘Copy Image.’ 5. Open up a word processing document in another window. 6. In the word processing document, right-click and select ‘Paste.’ 7. Your image will appear, and you can resize it simply by left-clicking again over the image, which should outline it with a black border and dots to mark the edges. With the size of the piece you're working on as a background in mind, resize the picture to fit by moving the mouse. 8. Print on a color printer. Cut it out and paste it to your glass jar using Mod Podge. A simple white craft glue like Elmers also works just fine to adhere your design; however, you will need Mod Podge to seal the piece when you are finished designing it. This will give it a polished and beautiful . 9. This is an easy and inexpensive way to get flower pictures to use for decoupage projects! |


